If you feel your Internet connection is slower than what it should be or you notice that certain websites get blocked while browsing, it could be because all your Internet traffic is going through a proxy server. A proxy server is basically just another computer that sits between you and your ISP. It’s usually configured in corporate environments to filter web traffic going to and from employee computers. In this article, I’ll show you how you can check your proxy settings to see if your computer is indeed using a proxy server or not. In most cases, you won’t actually be able to turn off the proxy server, since it is controlled by an administrator. However, there are times when personal computers accidentally or maliciously get set to use a proxy server.
Check Proxy Settings in Windows
In Windows, most browsers will use the proxy settings that are set on the computer. Each browser has a settings page to adjust proxy settings, but they normally just link to the settings dialog in Windows itself. In Windows 10, there are two ways to go about changing the settings: via the Settings app or via the traditional Control Panel. I’ll mention both methods here because the Control Panel method is what you’ll need to use for Windows 7, 8 or Windows Vista.
Windows 10 Settings App
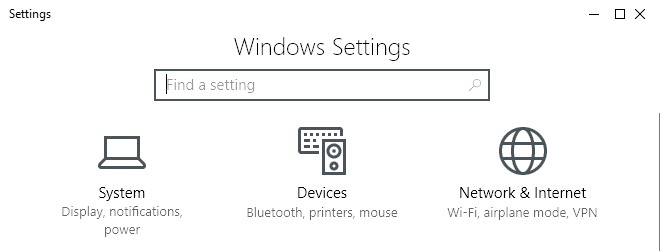
Click on Start and then click on the gear icon (Settings) at the far left. In Settings, click on Network & Internet.
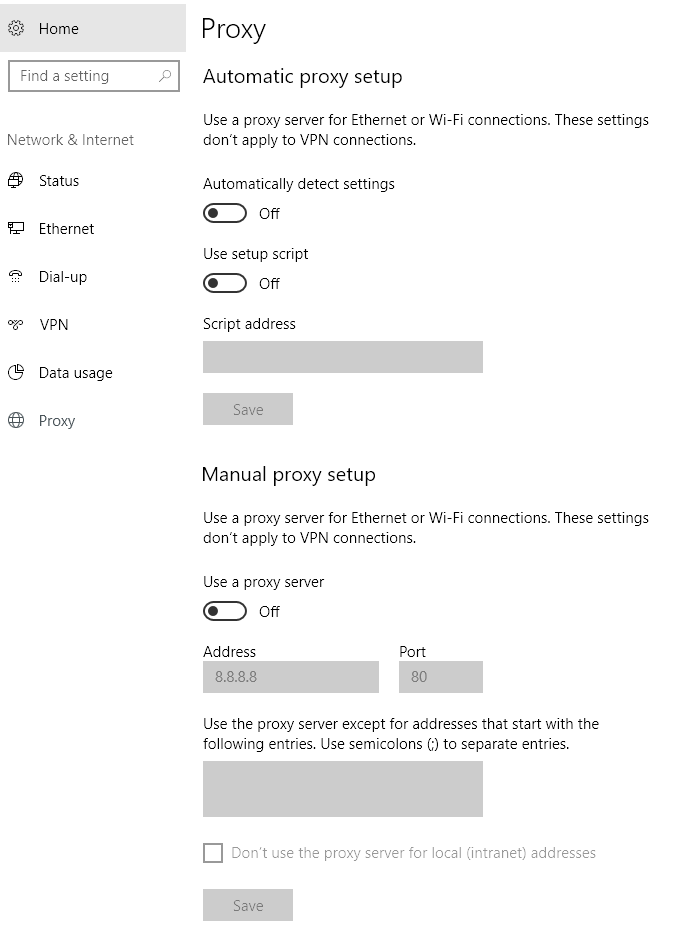
In the left-hand pane, click on Proxy at the very bottom.
Here you have all the settings that are related to setting up a proxy in Windows. It’s basically split into two configurations: either Automatic or Manual proxy setup. In 99% of the cases, everything should be set to Off. If anything is turned on, your web traffic could be going through a proxy.
Control Panel
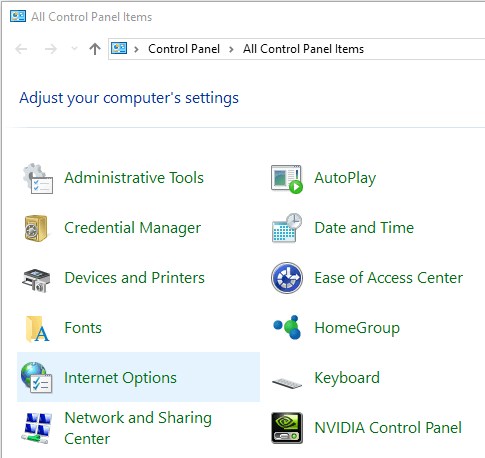
If you’re using an older version of Windows or if you just like the old way, you can edit the same settings via the Control Panel. Note that whichever way you choose to edit the settings, there are only one set of proxy settings in Windows. Once you open Control Panel, just click on Internet Options.
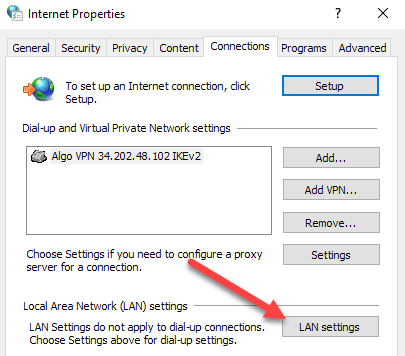
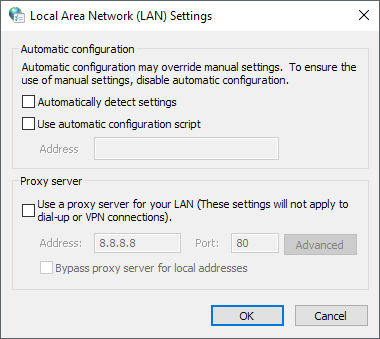
In the Internet Options dialog, go ahead and click on the Connections tab and then click on LAN settings at the bottom.
Here you will see all the same settings as in the Settings app shown above. Anything you configure here will show up there and vice versa.
Check Proxy Settings in Mac OS X
If you are using a Mac with OS X, then the procedure is similar. You have to change the proxy settings in System Preferences as this is where most browsers check automatically.
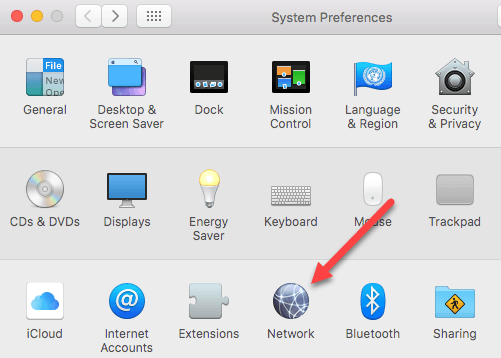
Open System Preferences and click on Network. On the left-hand side, make sure to select the connected or active network connection. You can have different proxy settings for each type of network connection.
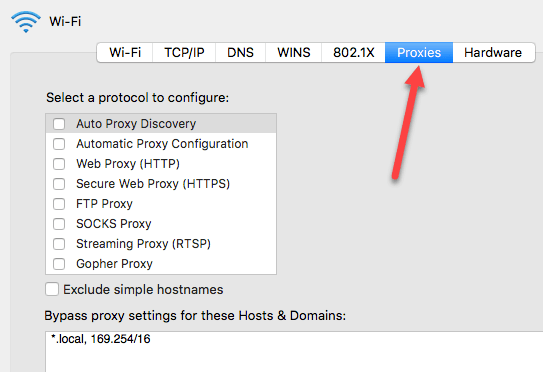
At the bottom, click on the Advanced button. Click on the Proxies tab and you’ll see a bunch of different protocols you can configure.
For example, if you click on Web Proxy (HTTP), you’ll be able to enter the proxy server IP address, port number, username and password.
Check Proxy Settings in Linux
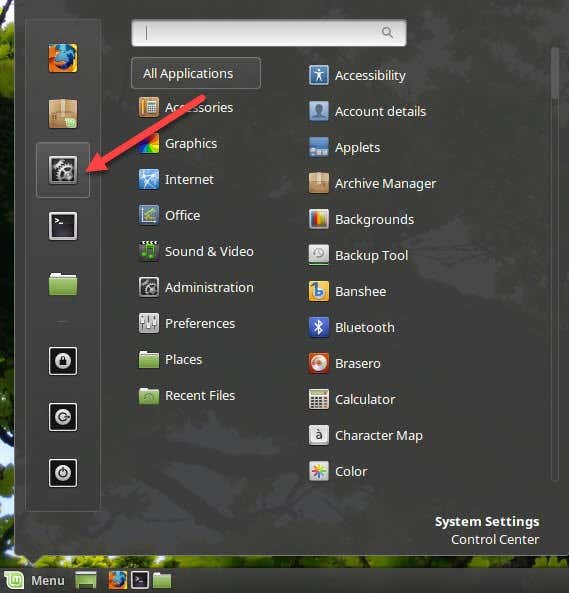
In Linux, it really depends on what distribution you are running. Mostly, though, it’s going to be some version of KDE or GNOME. For example, in Linux Mint Cinnamon, which is based heavily on GNOME, you would click on the button and then click on System Settings.
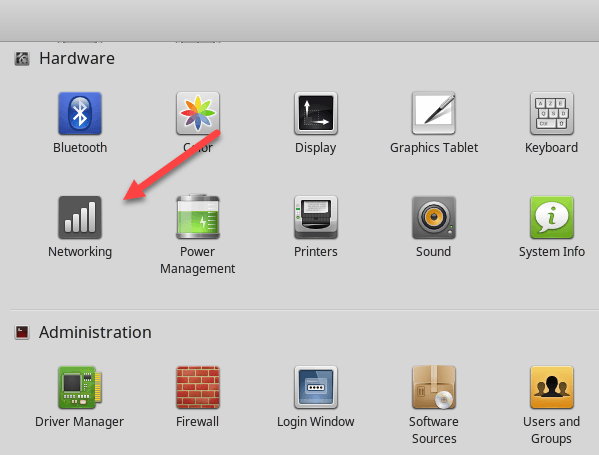
Next, you would scroll down to Hardware and then click on Networking.
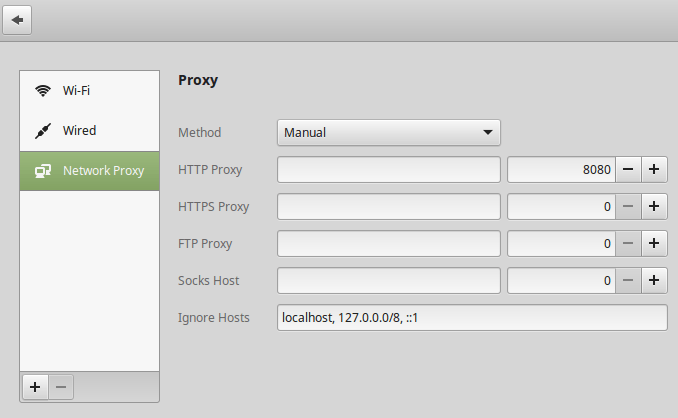
Finally, if you click on Network Proxy, you can choose from Automatic or Manual.
This is pretty much the same procedure for Ubuntu also, which uses Unity and GNOME. It’ll be different if you are using a different desktop environment. If you have any questions, feel free to comment. Enjoy!

title: “How To Check The Proxy Server Settings On Your Computer” ShowToc: true date: “2023-05-14” author: “John Bent”
If you feel your Internet connection is slower than what it should be or you notice that certain websites get blocked while browsing, it could be because all your Internet traffic is going through a proxy server. A proxy server is basically just another computer that sits between you and your ISP. It’s usually configured in corporate environments to filter web traffic going to and from employee computers. In this article, I’ll show you how you can check your proxy settings to see if your computer is indeed using a proxy server or not. In most cases, you won’t actually be able to turn off the proxy server, since it is controlled by an administrator. However, there are times when personal computers accidentally or maliciously get set to use a proxy server.
Check Proxy Settings in Windows
In Windows, most browsers will use the proxy settings that are set on the computer. Each browser has a settings page to adjust proxy settings, but they normally just link to the settings dialog in Windows itself. In Windows 10, there are two ways to go about changing the settings: via the Settings app or via the traditional Control Panel. I’ll mention both methods here because the Control Panel method is what you’ll need to use for Windows 7, 8 or Windows Vista.
Windows 10 Settings App
Click on Start and then click on the gear icon (Settings) at the far left. In Settings, click on Network & Internet.
In the left-hand pane, click on Proxy at the very bottom.
Here you have all the settings that are related to setting up a proxy in Windows. It’s basically split into two configurations: either Automatic or Manual proxy setup. In 99% of the cases, everything should be set to Off. If anything is turned on, your web traffic could be going through a proxy.
Control Panel
If you’re using an older version of Windows or if you just like the old way, you can edit the same settings via the Control Panel. Note that whichever way you choose to edit the settings, there are only one set of proxy settings in Windows. Once you open Control Panel, just click on Internet Options.
In the Internet Options dialog, go ahead and click on the Connections tab and then click on LAN settings at the bottom.
Here you will see all the same settings as in the Settings app shown above. Anything you configure here will show up there and vice versa.
Check Proxy Settings in Mac OS X
If you are using a Mac with OS X, then the procedure is similar. You have to change the proxy settings in System Preferences as this is where most browsers check automatically.
Open System Preferences and click on Network. On the left-hand side, make sure to select the connected or active network connection. You can have different proxy settings for each type of network connection.
At the bottom, click on the Advanced button. Click on the Proxies tab and you’ll see a bunch of different protocols you can configure.
For example, if you click on Web Proxy (HTTP), you’ll be able to enter the proxy server IP address, port number, username and password.
Check Proxy Settings in Linux
In Linux, it really depends on what distribution you are running. Mostly, though, it’s going to be some version of KDE or GNOME. For example, in Linux Mint Cinnamon, which is based heavily on GNOME, you would click on the button and then click on System Settings.
Next, you would scroll down to Hardware and then click on Networking.
Finally, if you click on Network Proxy, you can choose from Automatic or Manual.
This is pretty much the same procedure for Ubuntu also, which uses Unity and GNOME. It’ll be different if you are using a different desktop environment. If you have any questions, feel free to comment. Enjoy!


